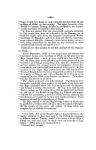
Map to illustrate the Siamese question.
-67 - In this year, 1861, the Sultan of Trengginu visited Singapore, and complained to the Governor that it was reported the Siamese intended to depose him by force. On the receipt of further information to the same tenor, the Governor of the Straits protested, through H. M.'s Consul at Bangkok, against any Siamese interference in Trengganu, pointing out that such action would constitute an infraction of the treaty. On receipt of the Governor's remonstrance the King of Siam denied the rumour and matters remained quiet for some months. The first King of Siam meanwhile married the sister of the ex-Sultan of Lingga, and in 1862 sent word to the Sultan of Trengghnu to prepare to receive the ex-Sultan, then living in Bangkok. At the same time the ex-Sultan was sent to Trengganu, and to the same place went Inche WAN AHIIMED, who had been for some time living in Kelantan. The Governor of the Straits Settlements (Colonel, now General, Sir ORFEUR CAVENAGH), seeing in this meeting the prospect of further troubles in Pahang, sent letters to the Sultan of Trengganu desiring his Highness to send the ex-Sultan of Lingga back to Bangkok. The Sultan did not, however, do as he was desired, and after a good deal of correspondence, two vessels-of-war visited Trengganu, with a Civil Officer bearing the ultimatum from the Governor to the Sultan. As the Governor's request was not complied with the Sultan of Trengginu's fort was shelled by the British vessels. The Siamese Government, which, in reply to the representation of General CAVENAGH, had promised to remove the exsultan from Trengganu, did not carry out its engagement till March, 1863, and that only after the strong action described. The measures taken by Governor CAVENAGH were justified in the following papers which were printed in October, 1863. The first is a narrative of events, while the two letters to H. M.'s Consul at Bangkok maintain the treaty independence of the States of Trengganu and Kelantan.
-
Scan 1

Page #1 - Front Matter
-
Scan 2

Page #2 - Front Matter
-
Scan 3

Page #3 - Front Matter
-
Scan 4

Page #4 - Title Page
-
Scan 5

Page #5
-
Scan 6

Page #6
-
Scan 7

Page #7
-
Scan 8

Page #8
-
Scan 9

Page 1
-
Scan 10

Page 2
-
Scan 11

Page 3
-
Scan 12

Page 4
-
Scan 13

Page 5
-
Scan 14

Page 6
-
Scan 15

Page 7
-
Scan 16

Page 8
-
Scan 17

Page 9
-
Scan 18

Page 10
-
Scan 19

Page 11
-
Scan 20

Page 12
-
Scan 21

Page 13
-
Scan 22

Page 14
-
Scan 23

Page 15
-
Scan 24

Page 16
-
Scan 25

Page 17
-
Scan 26

Page 18
-
Scan 27

Page 19
-
Scan 28

Page 20
-
Scan 29

Page 21
-
Scan 30

Page 22
-
Scan 31

Page 23
-
Scan 32

Page 24
-
Scan 33

Page 25
-
Scan 34

Page 26
-
Scan 35

Page 27
-
Scan 36

Page 28
-
Scan 37

Page 29
-
Scan 38

Page 30
-
Scan 39

Page 31
-
Scan 40

Page 32
-
Scan 41

Page 33
-
Scan 42

Page 34
-
Scan 43

Page 35
-
Scan 44

Page 36
-
Scan 45

Page 37
-
Scan 46

Page 38
-
Scan 47

Page 39
-
Scan 48

Page 40
-
Scan 49

Page 41
-
Scan 50

Page 42
-
Scan 51

Page 43
-
Scan 52

Page 44
-
Scan 53

Page 45
-
Scan 54

Page 46
-
Scan 55

Page 47
-
Scan 56

Page 48
-
Scan 57

Page 49
-
Scan 58

Page 50
-
Scan 59

Page 51
-
Scan 60

Page 52
-
Scan 61

Page 53
-
Scan 62

Page 54
-
Scan 63

Page 55
-
Scan 64

Page 56
-
Scan 65

Page 57
-
Scan 66

Page 58
-
Scan 67

Page 59
-
Scan 68
Page 60
-
Scan 69

Page 61
-
Scan 70

Page 62
-
Scan 71

Page 63
-
Scan 72

Page 64
-
Scan 73

Page #73
-
Scan 74

Page #74
-
Scan 75

Page 65
-
Scan 76

Page 66
-
Scan 77

Page 67
-
Scan 78

Page 68
-
Scan 79

Page 69
-
Scan 80

Page 70
-
Scan 81

Page 71
-
Scan 82

Page 72
-
Scan 83

Page 73
-
Scan 84

Page 74
-
Scan 85

Page 75
-
Scan 86

Page 76
-
Scan 87

Page 77
-
Scan 88

Page 78
-
Scan 89

Page 79
-
Scan 90

Page 80
-
Scan 91

Page 81
-
Scan 92

Page 82
-
Scan 93

Page 83
-
Scan 94

Page 84
-
Scan 95

Page 85
-
Scan 96

Page 86
-
Scan 97

Page 87
-
Scan 98

Page 88
-
Scan 99

Page 89
-
Scan 100

Page 90
-
Scan 101

Page 91
-
Scan 102

Page 92
-
Scan 103

Page 93
-
Scan 104

Page 94
-
Scan 105

Page 95
-
Scan 106

Page 96
-
Scan 107

Page 97
-
Scan 108

Page #108
-
Scan 109

Page 1
-
Scan 110

Page 2
-
Scan 111

Page 3
-
Scan 112

Page 4
-
Scan 113

Page 5
-
Scan 114

Page 6
-
Scan 115

Page 7
-
Scan 116

Page 8
-
Scan 117

Page 9
-
Scan 118

Page 10
-
Scan 119

Page 11
-
Scan 120

Page 12
-
Scan 121

Page 13
-
Scan 122

Page 14
-
Scan 123

Page 15
-
Scan 124

Page 16
-
Scan 125

Page 17
-
Scan 126

Page #126
-
Scan 127

Page #127
-
Scan 128

Page #128
-
Scan 129

Page #129
-
Scan 130

Page #130
About this Item
- Title
- Map to illustrate the Siamese question.
- Canvas
- Page 67
- Publication
- Edinburgh :: W. & A.K. Johnston,
- 1893.
- Subject terms
- Malay Peninsula -- History.
- Thailand -- Foreign relations.
Technical Details
- Collection
- Digital General Collection
- Link to this Item
-
https://name.umdl.umich.edu/apf3019.0001.001
- Link to this scan
-
https://quod.lib.umich.edu/g/genpub/apf3019.0001.001/77
Rights and Permissions
These pages may be freely searched and displayed. Permission must be received for subsequent distribution in print or electronically. Please go to http://www.umdl.umich.edu/ for more information.
Related Links
IIIF
- Manifest
-
https://quod.lib.umich.edu/cgi/t/text/api/manifest/genpub:apf3019.0001.001
Cite this Item
- Full citation
-
"Map to illustrate the Siamese question." In the digital collection Digital General Collection. https://name.umdl.umich.edu/apf3019.0001.001. University of Michigan Library Digital Collections. Accessed June 24, 2025.